EXPERIMENT No-4.4
OBJECT: To understand the operation of SSH by accessing the routers remotely by PCs
Requirements
CISCO Packet Tracer Software
PC – 1
Router – 1
Copper Cross-Over LAN Cable
Procedure
- Open the CISCO Packet tracer software.
- Drag and drop 1 PC using End Device Icons on the left corner.
- Select Router from Router icon list in the left bottom corner.
- Select Routers and Give the IP address for Ethernet ports of router.
SSH Config steps? In this example, we will go through the below 7 steps one by one:
- IP Configurations
- Password Encryption
- Router Name Change
- Domain Data and Data Encryption
- Router User Config
- SSH Config
- SSH Verification
So, let’s start the SSH configuration and see how to make an SSH connection on the router.
IP Configurations
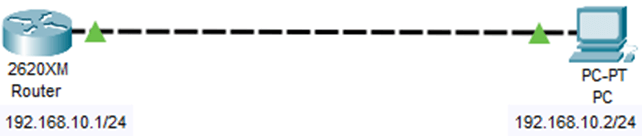
Before configuring SSH, first of all, we need to configure the router interface and the IP address of the PC.
Router fa0/0 Interface
IP : 192.168.10.1
Subnet: 255.255.255.0
PC
IP : 192.168.10.1
Subnet: 255.255.255.0
Gateway:192.168.10.1
Router>enable
Router#configure terminal
Router(config)#interface fa0/0
Router(config-if)#ip address 192.168.10.1 255.255.255.0
Router(config-if)#no shutdown
Router Name Change
To generate RSA key we need to change the name of the default router. Change this name to CSE.
Router(config)#hostname CSE
Domain Name and Data Encryption
We will set the domain name. The domain name will be SSHcse. And after that, encrypt the data in it with the command “Generate crypto key RSA (Rivest, Shamir, Adleman)”.
After this configuration we will determine the size of the module. We will use 512 here.
CSE(config)#ip domain-name SSHcse
CSE(config)#crypto key generate rsa
Router User Config
We will do it with username, password and the privilege level. Our user is gyancs, password is abc123 and the privilege mode is 15.
CSE(config)#username gyancs privilege 15 password abc123
We will use this username and password for SSH connection.
SSH Config
The main configuration step of this Configuring SSH lesson is this step. Here, we will do the SSH configuration in line mode.
Firstly, we will go to line mode and configure SSH for 16 users from 0 to 15. And then we will use “transport input ssh”. This command will allow only SSH access. Telnet accesses will be rejected.
Then, we will set the login as local with “login local” command. With this command, we can use local router users to ssh access.
After that, we will configure the the version of SSH. There are two SSH versions, SSH version 1 and SSH version 2. The second one provides more enhanced security algorithm. Here, we will use SSH version 2.
CSE(config)#line vty 0 15
CSE(config-line)#transport input ssh
CSE(config-line)#login local
CSE(config-line)#ip ssh version 2
CSE(config-line)#end
CSE# write
SSH Verification
At the last step of Configuring SSH, SSH Config Example; we can try to connect via SSH from PC to the router. Router interface ip is 192.168.10.1
PC>ssh –l gyancs 192.168.10.1
Open
Password: abc123
CSE#
How to Configure Telnet in Cisco Packet Tracer
About me